
If you have one of those ugly and heavy builder grade mirrors in your bathroom and have no clue what to do with it, lemme show you a really easy upgrade!
Now obviously you could just replace the mirror, but I’m guessing if you found this blog post that means you were looking for another option. Because we both know that replacing that monstrosity of a mirror involves taking it down and it’s HEAVY. Also there are the big ol’ anchor holes left behind that you will have to patch and paint over. So yes , that’s an option, but it’s not exactly as easy as swapping a picture on the wall. Not to mention the fact that buying a new mirror can be really expensive.
So because of allllll of that… Here is an option I found and put to the test that is easier and more affordable! And you might be shocked just how dramatically it can update your bathroom on a budget!
What You Will Need
- Clips / Brackets
- Molding Of Your Choice
- L Brackets
- Paint
I rounded up the links for everything I used here to make it even easier!
Pick Out Your Trim
First things first, you need to pick out which trim you want to use for this project. For my parents bathroom I picked one that resembled an antique chunky frame since we were going for a traditional vintage vibe. But you can pick whatever trim you love. This is also a great time to go ahead and pick out your paint colors or whatever type of finish you will want to use on your trim.
Measure and Cut Your Trim To Size
Next it’s time to cut your trim pieces.
I know this can be a little intimidating but I would start by simply measuring your 4 sides of your mirror and cutting the trim to that size. So in total, all you need is four pieces. ( Your top, bottom , left and right. )
Once you have your pieces cut to size, simply take a right triangle and draw your angles onto the ends of your pieces and cut those mitered edges. Just take your time and make sure that you cut the miters in the right direction so that they all line up at the end!
Assemble and Add Your Brackets
Now it’s time to assemble your frame!
I screwed each corner together on the back using short screws ( so they didn’t pop out the front of the frame) and the L brackets. You may find it’s easiest to have someone else help you hold your pieces together so you can make sure everything is attached together nice and snug.
While you have the frame face down, I would go ahead and add your hanging brackets. We found that one on each top corner and then one on each side near the bottom corners was the perfect amount to keep the frame secure to the mirror.
Just make sure to measure where the current mirror anchors will line up on the frame so that you don’t accidentally put a bracket where it interferes with a wall anchor.
Be mindful when moving your frame that the larger it is, the easier it will be for it to twist at the corners and lose its shape, so always try to keep everything straight while moving it.
Caulk and Paint Your Frame
It’s time to paint your mirror frame!
I would start by caulking the corners where your mitered edges are. This not only looks a little cleaner and more professional, but it will also help make those corners a little stronger too.
Once your caulked corners are dry, flip your frame back over face down and paint the back of the frame and all of the brackets and screws a dark color. I would recommend black. And I know this sounds crazy, but trust me, you do not want to skip this step. Since the frame is designed to slide over your existing mirror, you have to remember that the back of the frame WILL show up in the reflection of the mirror so you want that reflection to be as invisible as possible. And by painting everything a dark color, it will almost disappear in the reflection.
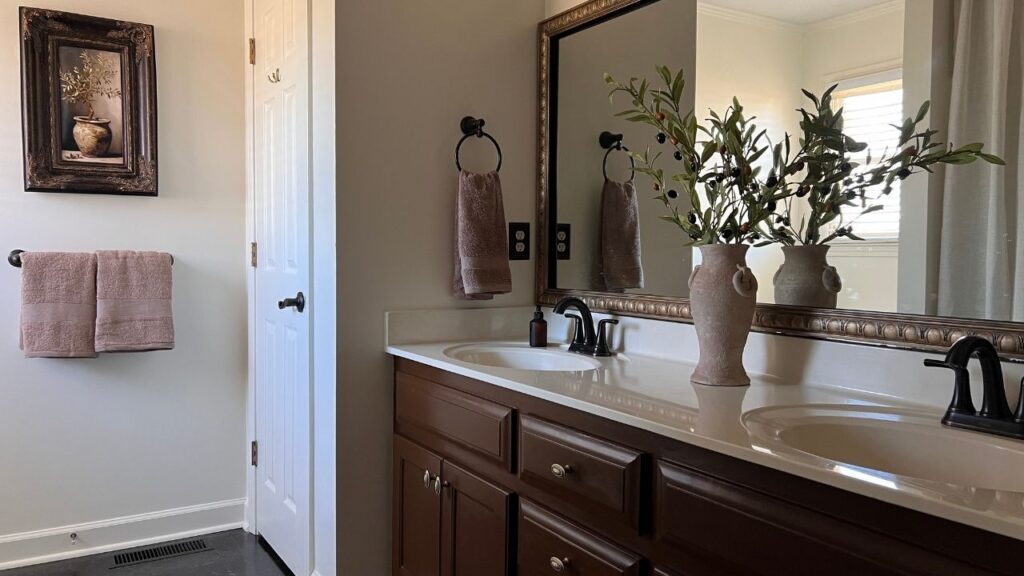
And then once the back of the frame is painted, you can finish off the front in any design or style you would like! Again, we were going for an antique chunky gold frame so I layered bronze and gold paints to create that antiqued look.
Install Your Frame
Installing the frame is as simple as sliding it over the mirror! Think about a paper doll and paper doll clothes. The mirror is the doll and the frame is the clothes sliding right over the top with the brackets we installed acting like the little paper tabs.
Now , depending on the size of your mirror and frame, you may still find it helpful to have someone help you with this even though the frame should be super light. But hopefully with a second set of hands you should find the installation to be easy peasy! And start enjoying your “new” mirror!
Again, this update may not be for everyone but if you are a renter or really just don’t want to deal with swapping out a big heavy mirror this is a really great option!
If you try this out for yourself pleaseeeeee share how it turns out with me! I would love to see!
And if you wanna see more from this makeover, you can check out the entire project here. Or to watch more detail on exactly how we built this frame, head over to YouTube!
Watch On YouTube!

Welcome To
")
Inspiration to design a home and a life that is full of joy.
I’ve been browsing online greater than 3 hours as of late, but
I by no means found any attention-grabbing article like yours.
It is beautiful worth enough for me. In my opinion, if all
webmasters and bloggers made just right content as you did, the net can be a lot more
useful than ever before.